Appearance
Java 开发笔记
Thymeleaf 模板引擎
声明
html
<html lang="en" xmlns:th="http://www.thymeleaf.org">标签复用
用index的header标签替换
html
<header class="bg-dark sticky-top" th:replace="index::header">动态链接
html
<link rel="stylesheet" th:href="@{/css/global.css}"/>
<form class="mt-5" method="post" enctype="multipart/form-data" th:action="@{/user/upload}"></form>
动态类
当属性值同时含有静态值与动态值时要在值的两边加|
html
 <input th:class="|custom-file-input ${error!=null?'is-invalid':''}|"
        id="head-image" type="file" name="headerImage" lang="es" required="">
动态文本
html
<div class="invalid-feedback" th:text="${error}">
  密码长度不能小于8位!
</div>
分页
html
<nav class="mt-5" th:if="${page.rows>0}">
  <ul class="pagination justify-content-center">
    <li class="page-item">
      <!--/index?current=1-->
      <a class="page-link" th:href="@{${page.path}(current=1)}">首页
      </a>
    </li>
    <li th:class="|page-item ${page.current==1?'disabled':''}|">
      <a class="page-link" th:href="@{${page.path}(current=${page.current-1})}">上一页
      </a>
    </li>
    <li th:class="|page-item ${i==page.current?'active':''}|"
        th:each="i:${#numbers.sequence(page.from,page.to)}">
      <a class="page-link" th:href="@{${page.path}(current=${i})}" th:text="${i}">1
      </a>
    </li>
    <li th:class="|page-item ${page.current==page.total?'disabled':''}|">
      <a class="page-link" th:href="@{${page.path}(current=${page.current+1})}">下一页
      </a>
    </li>
    <li class="page-item">
      <a class="page-link" th:href="@{${page.path}(current=${page.total})}">末页
      </a>
    </li>
  </ul>
</nav>
循环
html
<ul class="list-unstyled">
  <li class="media pb-3 pt-3 mb-3 border-bottom" th:each="map:${discussPosts}">
    <a href="site/profile.html">
      <img th:src="${map.user.headerUrl}" class="mr-4 rounded-circle" alt="用户头像"
           style="width:50px;height:50px;">
    </a>
    <div class="media-body">
      <h6 class="mt-0 mb-3">
        <!--utext可以修改转义字符-->
        <a href="#" th:utext="${map.post.title}">备战春招,面试刷题跟他复习,一个月全搞定!</a>
        <span class="badge badge-secondary bg-primary" th:if="${map.post.type == 1}">置顶</span>
        <span class="badge badge-secondary bg-danger" th:if="${map.post.status == 1}">精华</span>
      </h6>
      <div class="text-muted font-size-12">
        <u class="mr-3">寒江雪</u> 发布于 <b
        th:text="${#dates.format(map.post.createTime,'yyyy-MM-dd HH:mm:ss')}">2019-04-15
        15:32:18</b>
        <ul class="d-inline float-right">
          <li class="d-inline ml-2">赞 11</li>
          <li class="d-inline ml-2">|</li>
          <li class="d-inline ml-2">回帖 7</li>
        </ul>
      </div>
    </div>
  </li>
</ul>
编写Thymeleaf项目时候应配置热部署
- 开启idea中的自动构建功能
- 在配置文件中关闭Thymeleaf的缓存功能
properties
spring.thymeleaf.cache=false- 从pom中引入devtools依赖
xml
<!-- 热部署依赖-->
<dependency>
  <groupId>org.springframework.boot</groupId>
  <artifactId>spring-boot-devtools</artifactId>
  <optional>true</optional> <!-- 这个需要为 true 热部署才有效 -->
  <scope>runtime</scope>     <!--只在运行时起作用  打包时不打进去-->
</dependency>- 给构建项目添加快捷键
- 在浏览器中添加LiveReload插件 配置完成后即可运行项目,在修改代码文件后使用构建项目的快捷键,然后再将浏览器刷新即可。
Spring Email 发送邮件
这里使用OutLook邮箱为例
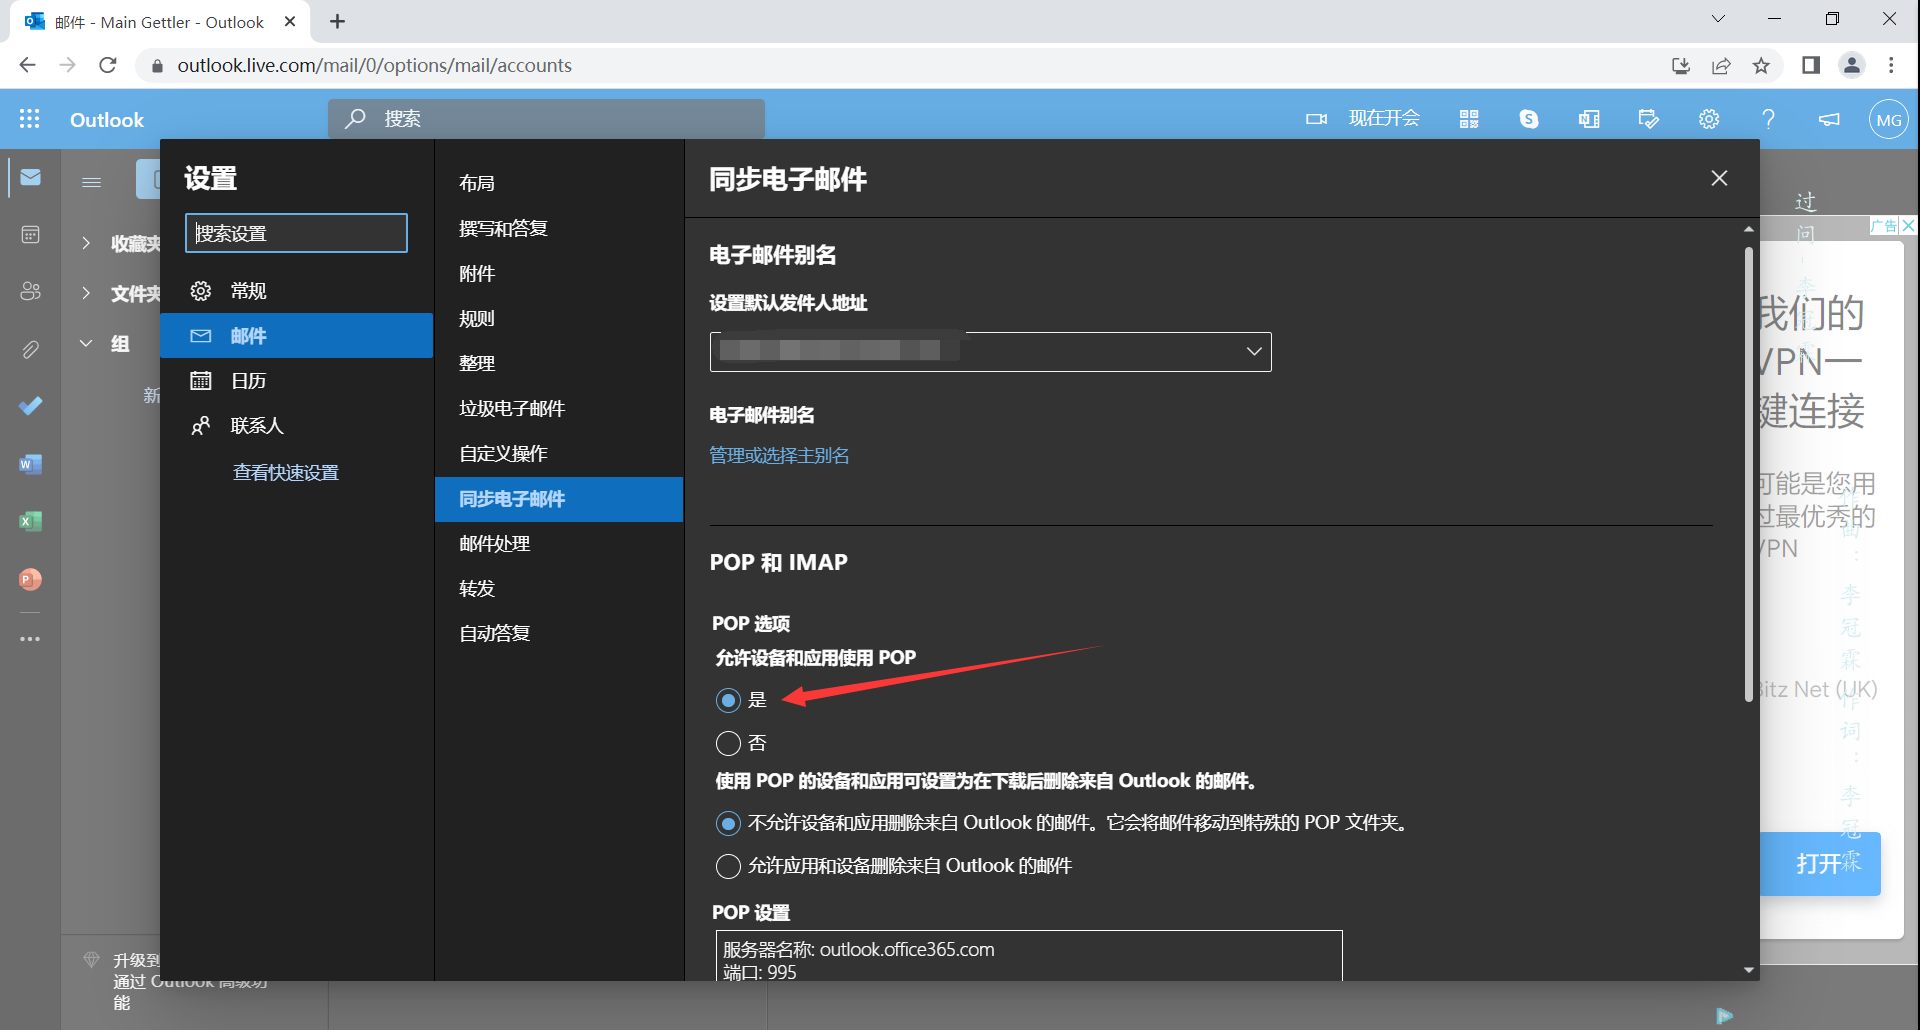
打开 maven仓库
搜索 spring mail
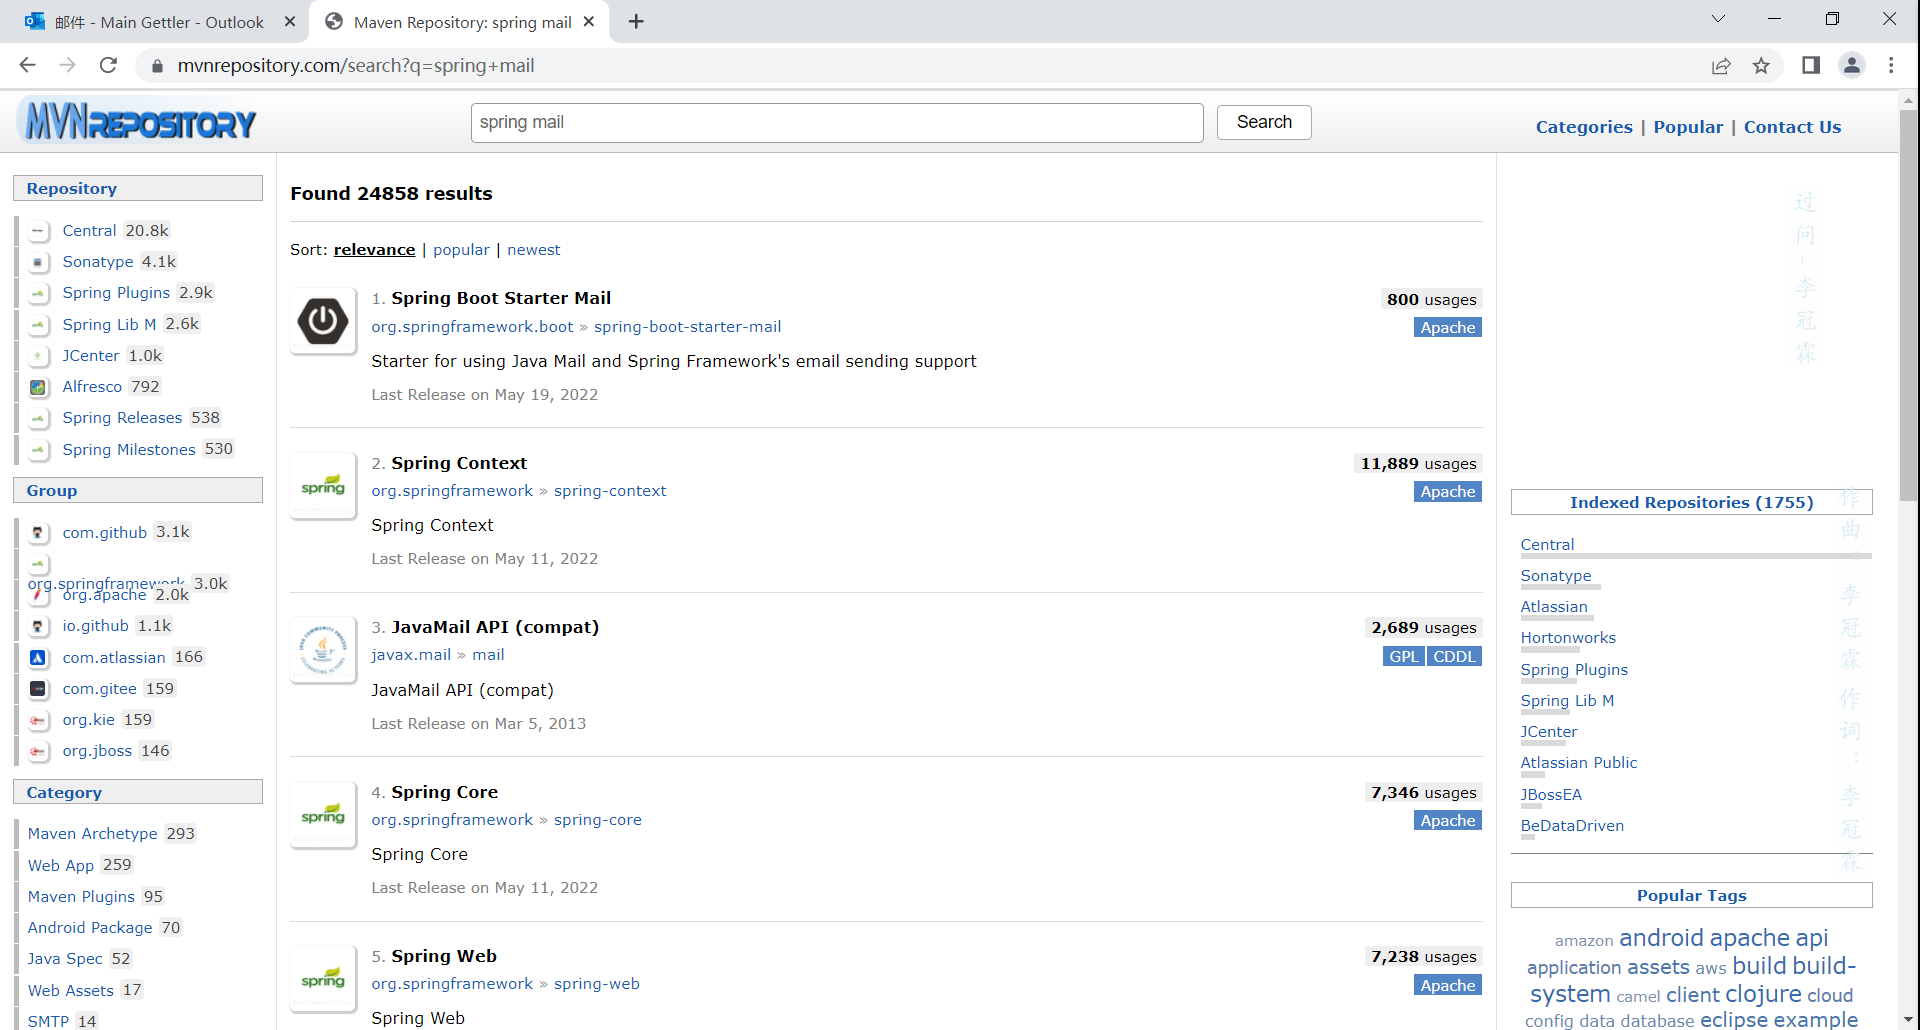
选择第一个,选个版本后复制添加到pom.xml
xml
<dependency>
  <groupId>org.springframework.boot</groupId>
  <artifactId>spring-boot-starter-mail</artifactId>
  <version>2.7.0</version>
</dependency>将配置信息添加到application.properties中
properties
# MailProperties
spring.mail.host=smtp.office365.com
spring.mail.port=587
spring.mail.username=xxxxx@outlook.com
spring.mail.password=xxxxxx
spring.mail.protocol=smtp
spring.mail.smtp.starttls.enable=true
spring.mail.smtp.auth=true
spring.mail.debug=true接着编写MailClient类
java
package com.gettler.community.util;

import org.slf4j.Logger;
import org.slf4j.LoggerFactory;
import org.springframework.beans.factory.annotation.Value;
import org.springframework.stereotype.Component;

import javax.mail.*;
import javax.mail.internet.InternetAddress;
import javax.mail.internet.MimeMessage;
import java.util.Properties;

@Component
public class MailClient {

  private static final Logger logger = LoggerFactory.getLogger(MailClient.class);

  @Value("${spring.mail.username}")
  private String from;
  @Value("${spring.mail.host}")
  private String host;
  @Value("${spring.mail.protocol}")
  private String protocol;
  @Value("${spring.mail.port}")
  private String port;
  @Value("${spring.mail.password}")
  private String password;

  public void sendMail(String to, String subject, String content) {
    final Properties props = new Properties();
    props.put("mail.smtp.auth", "true");
    props.put("mail.smtp.host", host);
    props.put("mail.store.protocol", protocol);
    props.put("mail.smtp.port", port);
    //开启SSL
    props.put("mail.smtp.starttls.enable", "true");
    props.put("mail.smtp.socketFactory.port", port);
    props.put("mail.smtp.socketFactory.fallback", "false");
    try {
      Session session = Session.getDefaultInstance(props, new Authenticator() {
        @Override
        protected PasswordAuthentication getPasswordAuthentication() {
          return new PasswordAuthentication(from, password);//账号密码
        }
      });
      session.setDebug(true);
      // 创建邮件消息
      MimeMessage message = new MimeMessage(session);
      // 设置发件人
      InternetAddress form = new InternetAddress(from);
      message.setFrom(form);
      // 设置收件人
      InternetAddress toAddress = new InternetAddress(to);
      message.setRecipient(Message.RecipientType.TO, toAddress);
      // 设置邮件标题
      message.setSubject(subject);
      // 设置邮件的内容体
      message.setContent(content, "text/html;charset=UTF-8");
      // 发送邮件
      Transport.send(message);
      System.out.println("Success");
      return;
    } catch (Exception e) {
      e.printStackTrace();
      logger.error("发送邮件失败" + e.getMessage());
      System.out.println("error" + e.getMessage());
    }
    System.out.println("Failed");
  }
}
编写测试函数
Java
@Autowired private MailClient mailClient;

@Test public void testTextEmail(){
  mailClient.sendMail("xxxxxxxx@qq.com","测试JavaMail","lyl睡不醒");
}发送html
编写html文件
html
<!DOCTYPE html>
<html lang="en" xmlns:th="http://www.thymeleaf.org">
<head>
  <meta charset="UTF-8">
  <title>邮件示例</title>
</head>
<body>
<p>lyl不起床!!!<span style="color: red;" th:text="${username}"></span></p>
</body>
</html>
编写测试函数
java
@Autowired
private TemplateEngine templateEngine;

@Test
public void testHtmlEmail() {
  Context context = new Context();
  context.setVariable("username", "lyl");
  String content = templateEngine.process("/mail/demo", context);
  System.out.println(content);
  mailClient.sendMail("xxxxxx@qq.com", "HTML", content);
}
Kaptcha 生成验证码
在pom.xml中添加依赖
xml
<dependency>
  <groupId>com.github.penggle</groupId>
  <artifactId>kaptcha</artifactId>
  <version>2.3.2</version>
</dependency>编写Config类
java
package com.gettler.community.config;

import com.google.code.kaptcha.Producer;
import com.google.code.kaptcha.impl.DefaultKaptcha;
import com.google.code.kaptcha.util.Config;
import org.springframework.context.annotation.Bean;
import org.springframework.context.annotation.Configuration;

import java.util.Properties;

@Configuration
public class KaptchaConfig {

  @Bean
  public Producer kaptchaProducer() {
    Properties props = new Properties();
    // 图片宽度
    props.setProperty("kaptcha.img.width", "100");
    // 图片高度
    props.setProperty("kaptcha.img.height", "40");
    // 字号
    props.setProperty("kaptcha.textproducer.font.size", "32");
    // 字体颜色
    props.setProperty("kaptcha.textproducer.font.color", "0,0,0");
    // 验证码文本内容范围
    props.setProperty("kaptcha.textproducer.char.string", "0123456789ABCDEFGHIJKLMNOPQRSTUVWXYZ");
    // 验证码字符长度
    props.setProperty("kaptcha.textproducer.char.length", "4");
    // NoNoise : 原生无噪
    props.setProperty("kaptcha.noise.impl", "com.google.code.kaptcha.impl.NoNoise");
    DefaultKaptcha kaptcha = new DefaultKaptcha();
    Config config = new Config(props);
    kaptcha.setConfig(config);
    return kaptcha;
  }
}实现Controller方法
java
private static final org.slf4j.Logger logger = LoggerFactory.getLogger(LoginController.class);

@Autowired
Producer kaptchaProducer;

@RequestMapping(path = "/kaptcha", method = RequestMethod.GET)
public void getKaptcha(HttpServletResponse response, HttpSession session) {
  // 生成验证码
  String text = kaptchaProducer.createText();
  BufferedImage bufferedImage = kaptchaProducer.createImage(text);
  // 将验证码存入session
  session.setAttribute("kaptcha", text);
  // 将图片输出给浏览器
  response.setContentType("image/png");
  try {
    OutputStream outputStream = response.getOutputStream();
    ImageIO.write(bufferedImage, "png", outputStream);
  } catch (IOException e) {
    logger.error("响应验证码失败" + e.getMessage());
    //        e.printStackTrace();
  }
}
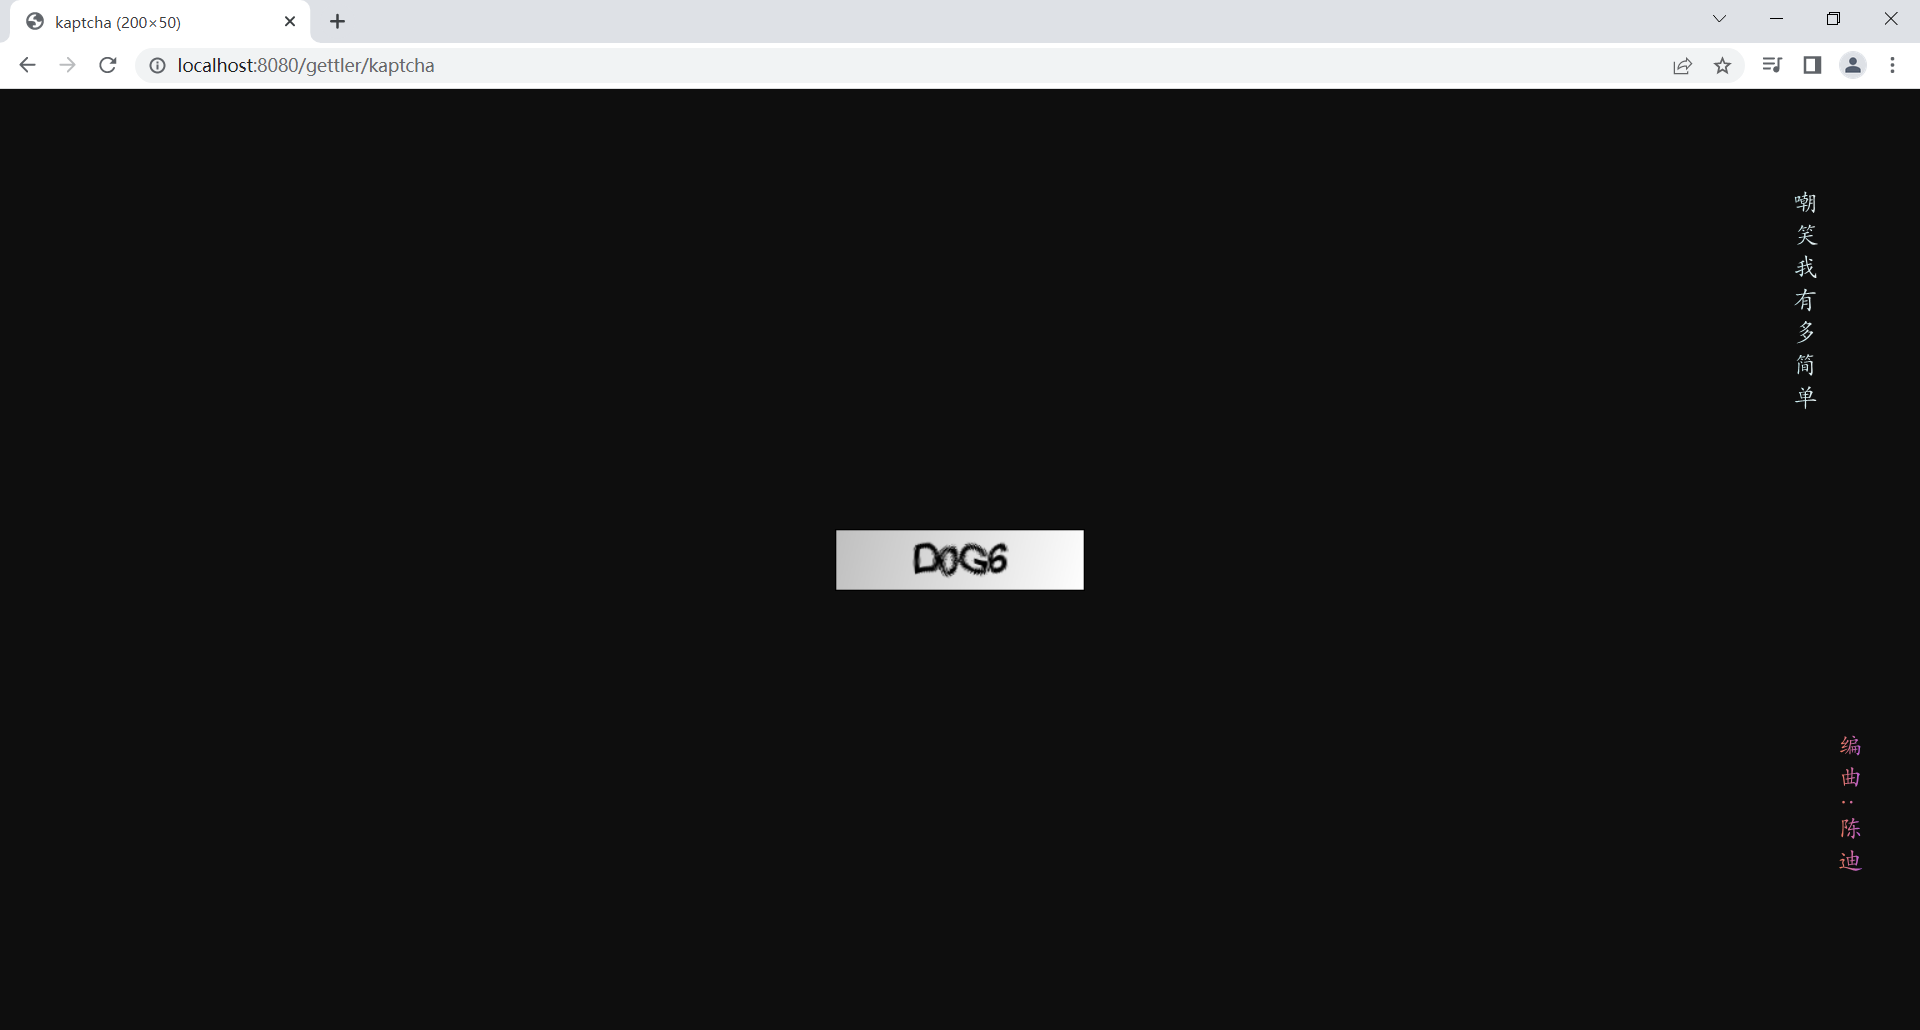
访问截图
上传文件
- 必须为
post请求 - 表单:enctype="multipart/form-data"
- Spring MVC:通过MultipartFile处理上传文件
首先修改配置文件,将上传路径添加到application.properties
properties
community.path.upload=d:/work/gettler/community/upload将配置文件中的变量注入UserController
java
@Value("${community.path.upload}") private String uploadPath;

@Value("${community.path.domain}") private String domain;

@Value("${server.servlet.context-path}") private String contextPath;
编写上传头像与访问头像方法
java
@RequestMapping(path = "/upload", method = RequestMethod.POST)
public String uploadHeader(MultipartFile headerImage, Model model) {
  if (headerImage == null) {
    model.addAttribute("error", "您还没有选择图片");
    return "/site/setting";
  }
  String fileName = headerImage.getOriginalFilename();
  String suffix = fileName.substring(fileName.lastIndexOf("."));
  if (StringUtils.isBlank(suffix)) {
    model.addAttribute("error", "不支持的文件类型");
    return "/site/setting";
  }
  // 生成随机文件名
  fileName = CommunityUtil.generateUUID() + suffix;
  // 确定文件上传路径
  System.out.println(uploadPath + "/" + fileName);
  File file = new File(uploadPath + "/" + fileName);
  try {
    // 存储文件
    headerImage.transferTo(file);
  } catch (Exception e) {
    logger.error("上传文件失败" + e.getMessage());
    throw new RuntimeException("上传文件失败");
  }
  // 更新用户头像
  userService.updateHeader(hostHolder.getUser().getId(),
    domain + contextPath + "/user/header/" + fileName);
  return "redirect:/index";
}

@RequestMapping(path = "/header/{fileName}", method = RequestMethod.GET)
public void getHeader(HttpServletResponse response, @PathVariable("fileName") String fileName) {
  // 服务器存放路径
  fileName = uploadPath + "/" + fileName;
  // 文件后缀
  String suffix = fileName.substring(fileName.lastIndexOf("."));
  // 响应图片
  response.setContentType("image/" + suffix);
  try {
    OutputStream outputStream = response.getOutputStream();
    FileInputStream fileInputStream = new FileInputStream(fileName);
    byte[] buffer = new byte[1024];
    int b = 0;
    while ((b = fileInputStream.read(buffer)) != -1) {
      outputStream.write(buffer, 0, b);
    }
  } catch (Exception e) {
    logger.error("获取头像失败" + e.getMessage());
  }
}
前端表单修改
html
<form class="mt-5" method="post" enctype="multipart/form-data" th:action="@{/user/upload}">
  <div class="form-group row mt-4">
    <label class="col-sm-2 col-form-label text-right">选择头像:</label>
    <div class="col-sm-10">
      <div class="custom-file">
        <input type="file" name="headerImage"
               th:class="|custom-file-input ${error!=null?'is-invalid':''}|" id="head-image"
               lang="es"
               required="">
        <label class="custom-file-label" for="head-image" data-browse="文件">选择一张图片</label>
        <div class="invalid-feedback" th:text="${error}">
          密码长度不能小于8位!
        </div>
      </div>
    </div>
  </div>
  <div class="form-group row mt-4">
    <div class="col-sm-2"></div>
    <div class="col-sm-10 text-center">
      <button type="submit" class="btn btn-info text-white form-control">立即上传</button>
    </div>
  </div>
</form>
拦截器
自定义注解
使用元注解
@Target 用来指定一个注解的使用范围,即被 @Target 修饰的注解可以用在什么地方
| 名称 | 说明 |
|---|---|
| CONSTRUCTOR | 用于构造方法 |
| FIELD | 用于成员变量(包括枚举常量) |
| LOCAL_VARIABLE | 用于局部变量 |
| METHOD | 用于方法 |
| PACKAGE | 用于包 |
| PARAMETER | 用于类型参数(JDK 1.8新增) |
| TYPE | 用于类、接口(包括注解类型)或 enum 声明 |
@Retention 用于描述注解的生命周期,也就是该注解被保留的时间长短。
- SOURCE:在源文件中有效(即源文件保留)
- CLASS:在 class 文件中有效(即 class 保留)
- RUNTIME:在运行时有效(即运行时保留)
@Inherited 是一个标记注解,用来指定该注解可以被继承
@Documented 是一个标记注解,没有成员变量。用 @Documented 注解修饰的注解类会被 JavaDoc 工具提取成文档
应用场景:访问某路径前判断是否已经登录
首先编写一个自定义注解
java
package com.gettler.community.annotation;


import java.lang.annotation.ElementType;
import java.lang.annotation.Retention;
import java.lang.annotation.RetentionPolicy;
import java.lang.annotation.Target;

@Target(ElementType.METHOD)
@Retention(RetentionPolicy.RUNTIME)
public @interface LoginRequired {

}再将@LoginRequired添加到需要判断的路径,编写拦截器代码如下
java
package com.gettler.community.contorller.interceptor;

import com.gettler.community.annotation.LoginRequired;
import com.gettler.community.util.HostHolder;
import org.springframework.beans.factory.annotation.Autowired;
import org.springframework.stereotype.Component;
import org.springframework.web.method.HandlerMethod;
import org.springframework.web.servlet.HandlerInterceptor;

import javax.servlet.http.HttpServletRequest;
import javax.servlet.http.HttpServletResponse;
import java.lang.reflect.Method;

@Component
public class LoginRequireInterceptor implements HandlerInterceptor {

  @Autowired
  private HostHolder hostHolder;

  @Override
  public boolean preHandle(HttpServletRequest request, HttpServletResponse response, Object handler) throws Exception {
    if (handler instanceof HandlerMethod) {
      HandlerMethod handlerMethod = (HandlerMethod) handler;
      Method method = handlerMethod.getMethod();
      LoginRequired loginRequired = method.getAnnotation(LoginRequired.class);
      if (loginRequired != null) {
        if (hostHolder.getUser() == null) {
          response.sendRedirect(request.getContextPath() + "/login");
          return false;
        }
      }
    }
    return true;
  }
}
过滤敏感词
java
package com.gettler.community.util;

import org.apache.commons.lang3.CharUtils;
import org.apache.commons.lang3.StringUtils;
import org.slf4j.Logger;
import org.slf4j.LoggerFactory;
import org.springframework.stereotype.Component;

import javax.annotation.PostConstruct;
import java.io.BufferedReader;
import java.io.InputStream;
import java.util.HashMap;
import java.util.Map;

/**
 * 敏感词过滤器
 */
@Component
public class SensitiveFilter {

  private static final Logger logger = LoggerFactory.getLogger(SensitiveFilter.class);

  // 替换符
  private static final String REPLACEMENT = "*";

  // 根节点
  private TrieNode rootNode = new TrieNode();

  @PostConstruct
  public void init() {
    try {
      InputStream is = this.getClass().getClassLoader().getResourceAsStream("sensitive-words.txt");
      BufferedReader reader = new BufferedReader(new java.io.InputStreamReader(is));
      String keyword;
      while ((keyword = reader.readLine()) != null) {
        // 添加到前缀树
        this.addKeyword(keyword);
      }
    } catch (Exception e) {
      logger.error("读取敏感词文件失败: ", e);
    }
  }

  // 将敏感词添加到前缀树中
  private void addKeyword(String keyword) {
    TrieNode tempNode = rootNode;
    for (int i = 0; i < keyword.length(); i++) {
      Character c = keyword.charAt(i);
      TrieNode subNode = tempNode.getSubNode(c);
      if (subNode == null) {
        subNode = new TrieNode();
        tempNode.addSubNode(c, subNode);
      }
      tempNode = subNode;
      if (i == keyword.length() - 1) {
        tempNode.setKeywordEnd(true);
      }
    }
  }

  // 过滤敏感词
  public String filter(String text) {
    if (StringUtils.isBlank(text)) {
      return null;
    }
    // 指针1
    TrieNode tempNode = rootNode;
    // 指针2
    int begin = 0;
    // 指针3
    int position = 0;
    // 结果
    StringBuilder result = new StringBuilder();
    while (position < text.length()) {
      Character c = text.charAt(position);
      // 跳过符号
      if (isSymbol(c)) {
        // 若指针1处于根节点,将此符号计入结果,让指针2向前移动一位
        if (tempNode == rootNode) {
          result.append(c);
          begin++;
        }
        // 无论符号在开头或中间,指针3都向前移动一位
        position++;
        continue;
      }
      // 检查下一节点
      tempNode = tempNode.getSubNode(c);
      if (tempNode == null) {
        // 没有下一节点,则指针1回到根节点,指针2计入结果,指针3向前移动一位
        result.append(text.charAt(begin));
        // 进入下一个位置
        position = ++begin;
        // 指针1重置为根节点
        tempNode = rootNode;
      } else if (tempNode.isKeywordEnd()) {
        // 如果指针1处于根节点且下一节点是关键词结尾,则替换为*
        result.append(REPLACEMENT);
        // 进入下一位置
        begin = ++position;
        // 指针1重置为根节点
        tempNode = rootNode;
      } else {
        // 检查下一字符
        position++;
      }
    }
    // 将最后一批字符计入结果
    result.append(text.substring(begin));
    return result.toString();
  }

  private boolean isSymbol(Character c) {
    // 0x2E80 - 0x9FFF 东亚文字范围
    return CharUtils.isAsciiAlphanumeric(c) && (c < 0x2E80 || c > 0x9FFF);
  }

  // 前缀树
  private class TrieNode {
    // 关键词结束标识
    private boolean isKeywordEnd = false;
    // 子节点<下级字符,下级节点>
    private Map<Character, TrieNode> subNodes = new HashMap<>();

    // 添加子节点
    public void addSubNode(Character key, TrieNode node) {
      subNodes.put(key, node);
    }

    // 获取子节点
    public TrieNode getSubNode(Character key) {
      return subNodes.get(key);
    }

    public boolean isKeywordEnd() {
      return isKeywordEnd;
    }

    public void setKeywordEnd(boolean keyWordEnd) {
      isKeywordEnd = keyWordEnd;
    }
  }

}
Redis实现缓存
添加依赖
xml
<dependency>
  <groupId>org.springframework.boot</groupId>
  <artifactId>spring-boot-starter-data-redis</artifactId>
</dependency>
添加配置
yaml
spring:
  redis:
    host: localhost # Redis服务器地址
    database: 0 # Redis数据库索引(默认为0)
    port: 6379 # Redis服务器连接端口
    password: # Redis服务器连接密码(默认为空)
    jedis:
      pool:
        max-active: 8 # 连接池最大连接数(使用负值表示没有限制)
        max-wait: -1ms # 连接池最大阻塞等待时间(使用负值表示没有限制)
        max-idle: 8 # 连接池中的最大空闲连接
        min-idle: 0 # 连接池中的最小空闲连接
    timeout: 3000ms # 连接超时时间(毫秒)
# 自定义redis key
redis:
  key:
    prefix:
      authCode: "portal:authCode:"
    expire:
      authCode: 120 # 验证码超期时间
在代码中注入
java
@Resource
StringRedisTemplate stringRedisTemplate;
代码实现缓存
java
@Operation(summary = "查找所有用户")
@RequestMapping(path = "/", method = RequestMethod.GET)
public Result findAllUsers() {
  ValueOperations<String, String> ops = stringRedisTemplate.opsForValue();
  String userList = ops.get("userList");
  if (userList == null) {
    List<UserVo> allUsersDb = findAllUsersDb();
    String toJSONString = JSON.toJSONString(allUsersDb);
    ops.set("userList", toJSONString);
    Map<String, Object> res = new HashMap<>();
    res.put("msg", "查找成功");
    res.put("users", allUsersDb);
    return Result.success(res);
  }
  List<UserVo> list = JSON.parseObject(userList, new TypeReference<List<UserVo>>() {
  });
  Map<String, Object> res = new HashMap<>();
  res.put("msg", "查找成功");
  res.put("users", list);
  return Result.success(res);
}

List<UserVo> findAllUsersDb() {
  List<UserVo> list;
  synchronized (this) {
    ValueOperations<String, String> ops = stringRedisTemplate.opsForValue();
    String userList = ops.get("userList");
    if (userList == null) {
      list = new ArrayList<>();
      for (User user : userService.findAllUsers()) {
        if (user.getIsDeleted() == 0) {
          list.add(userService.getVoByUser(user));
        }
      }
      System.out.println(111);
    } else {
      list = JSON.parseObject(userList, new TypeReference<List<UserVo>>() {
      });
    }
  }
  return list;
}
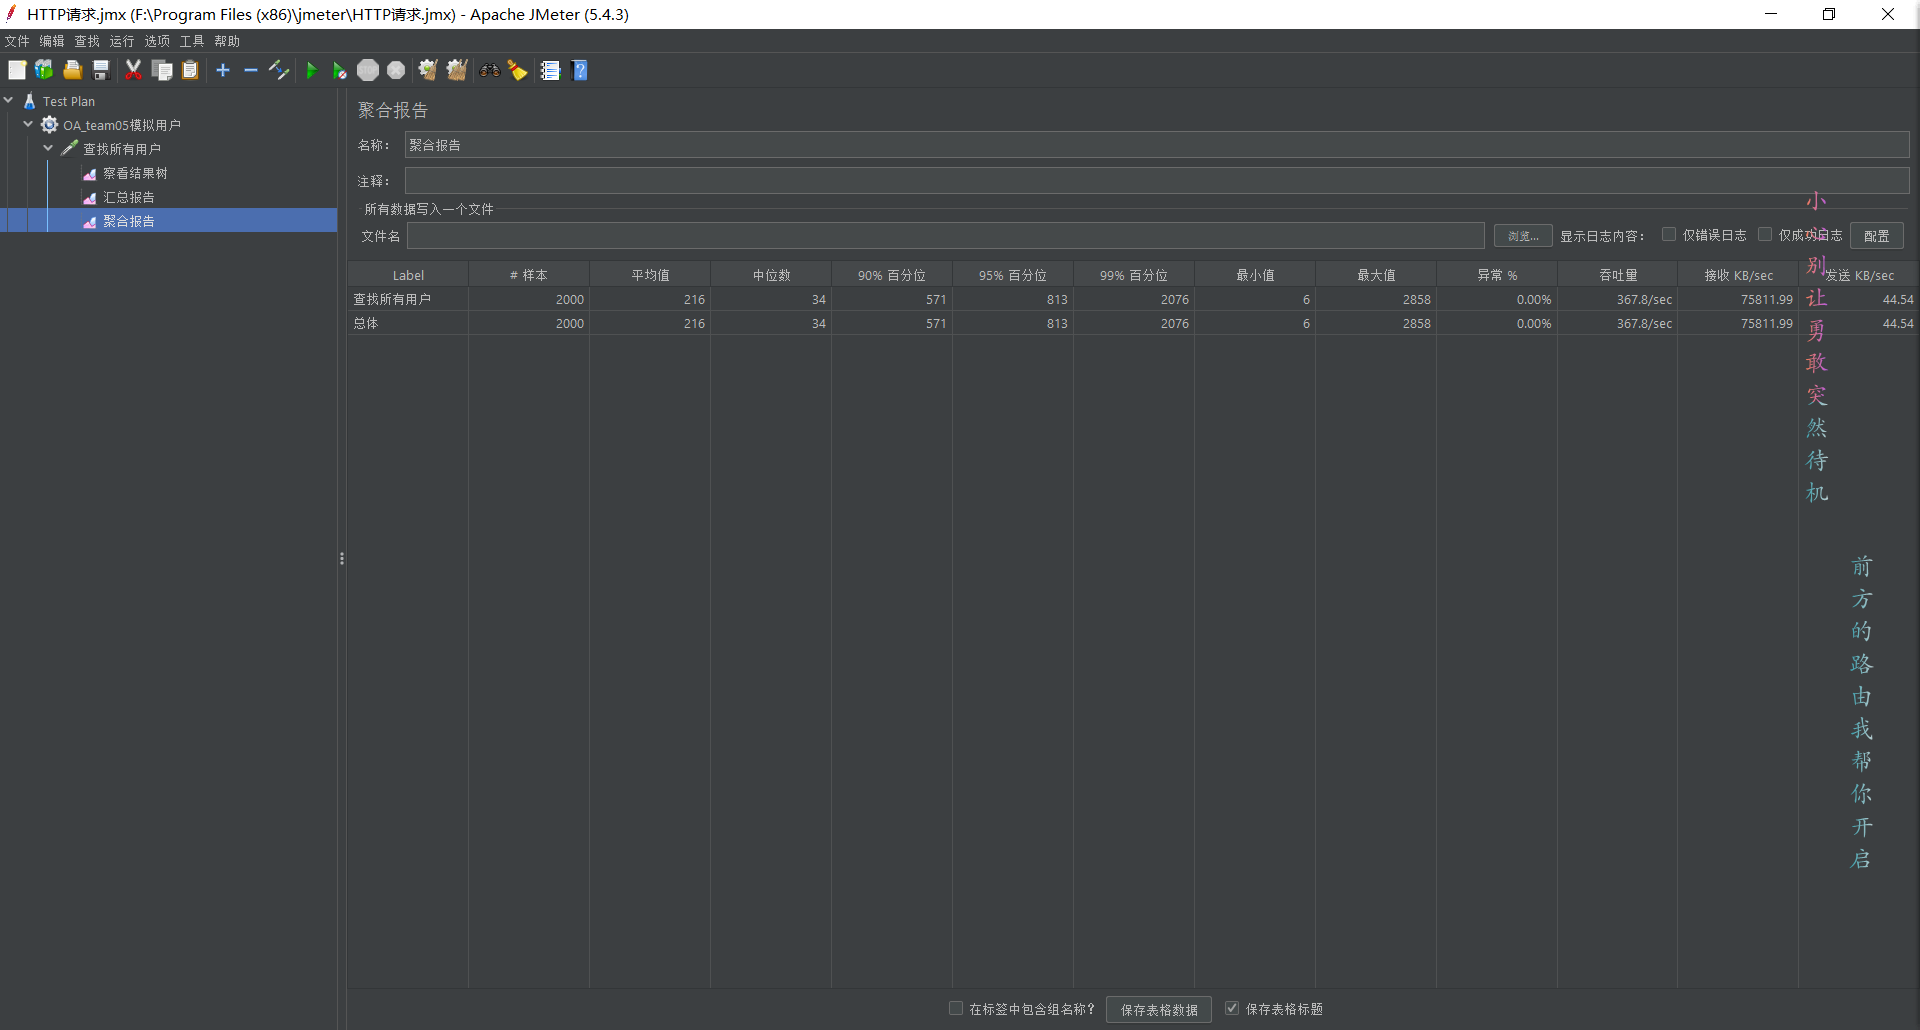
压力测试
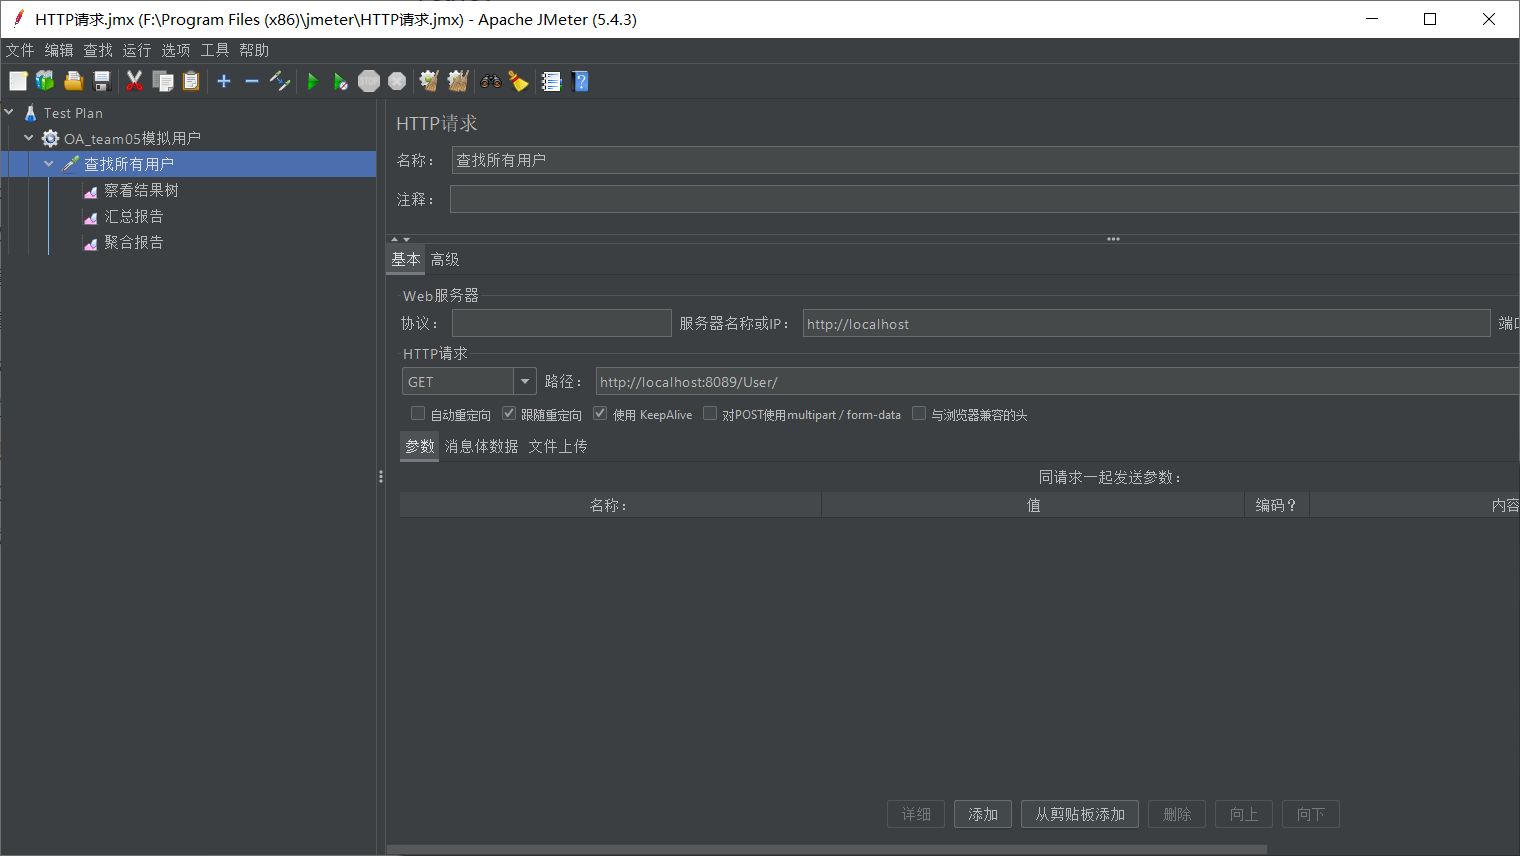
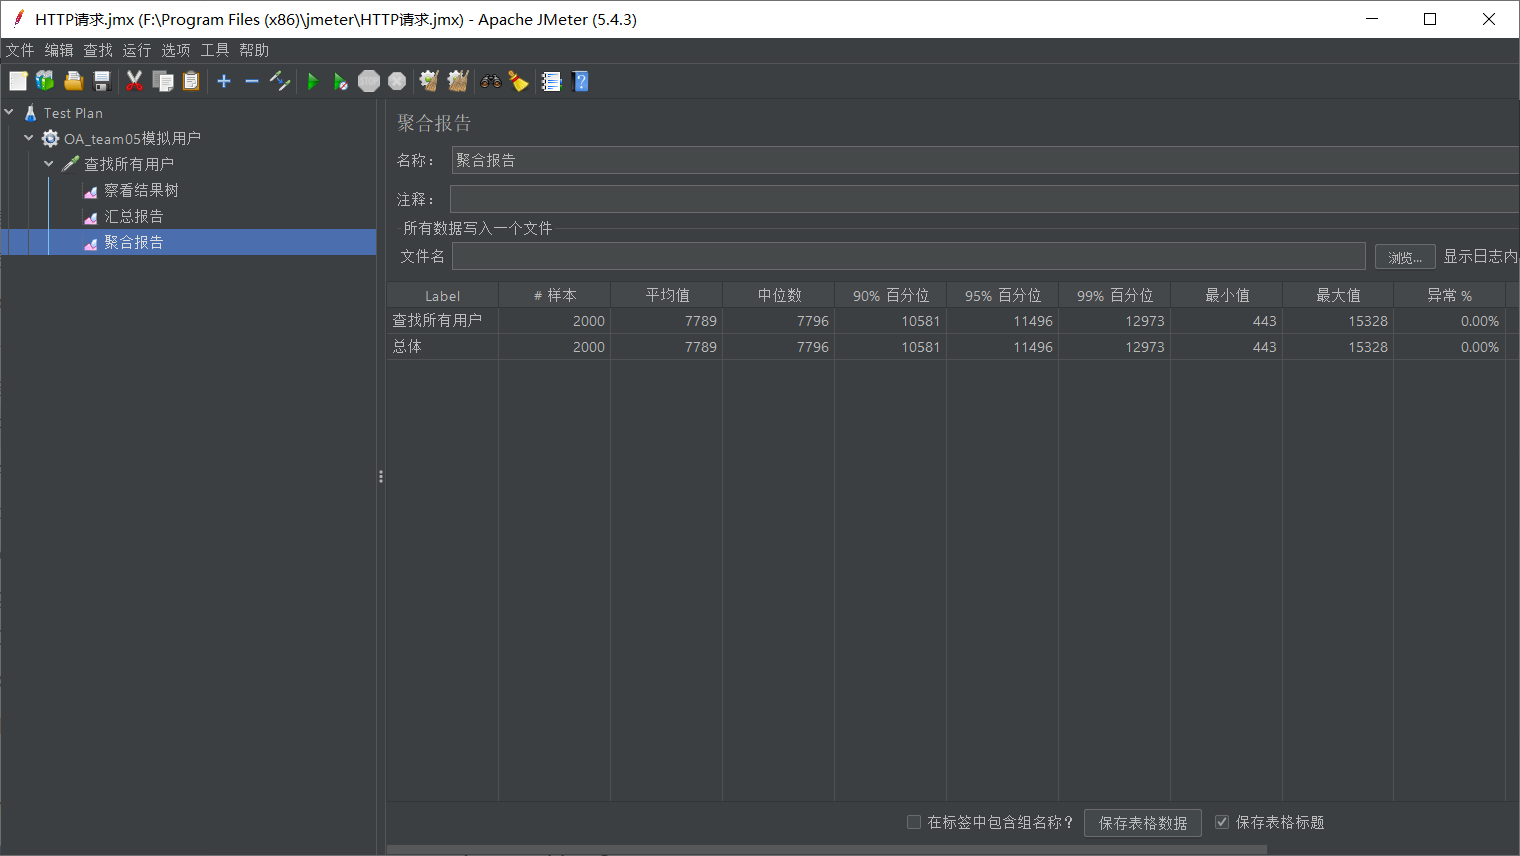
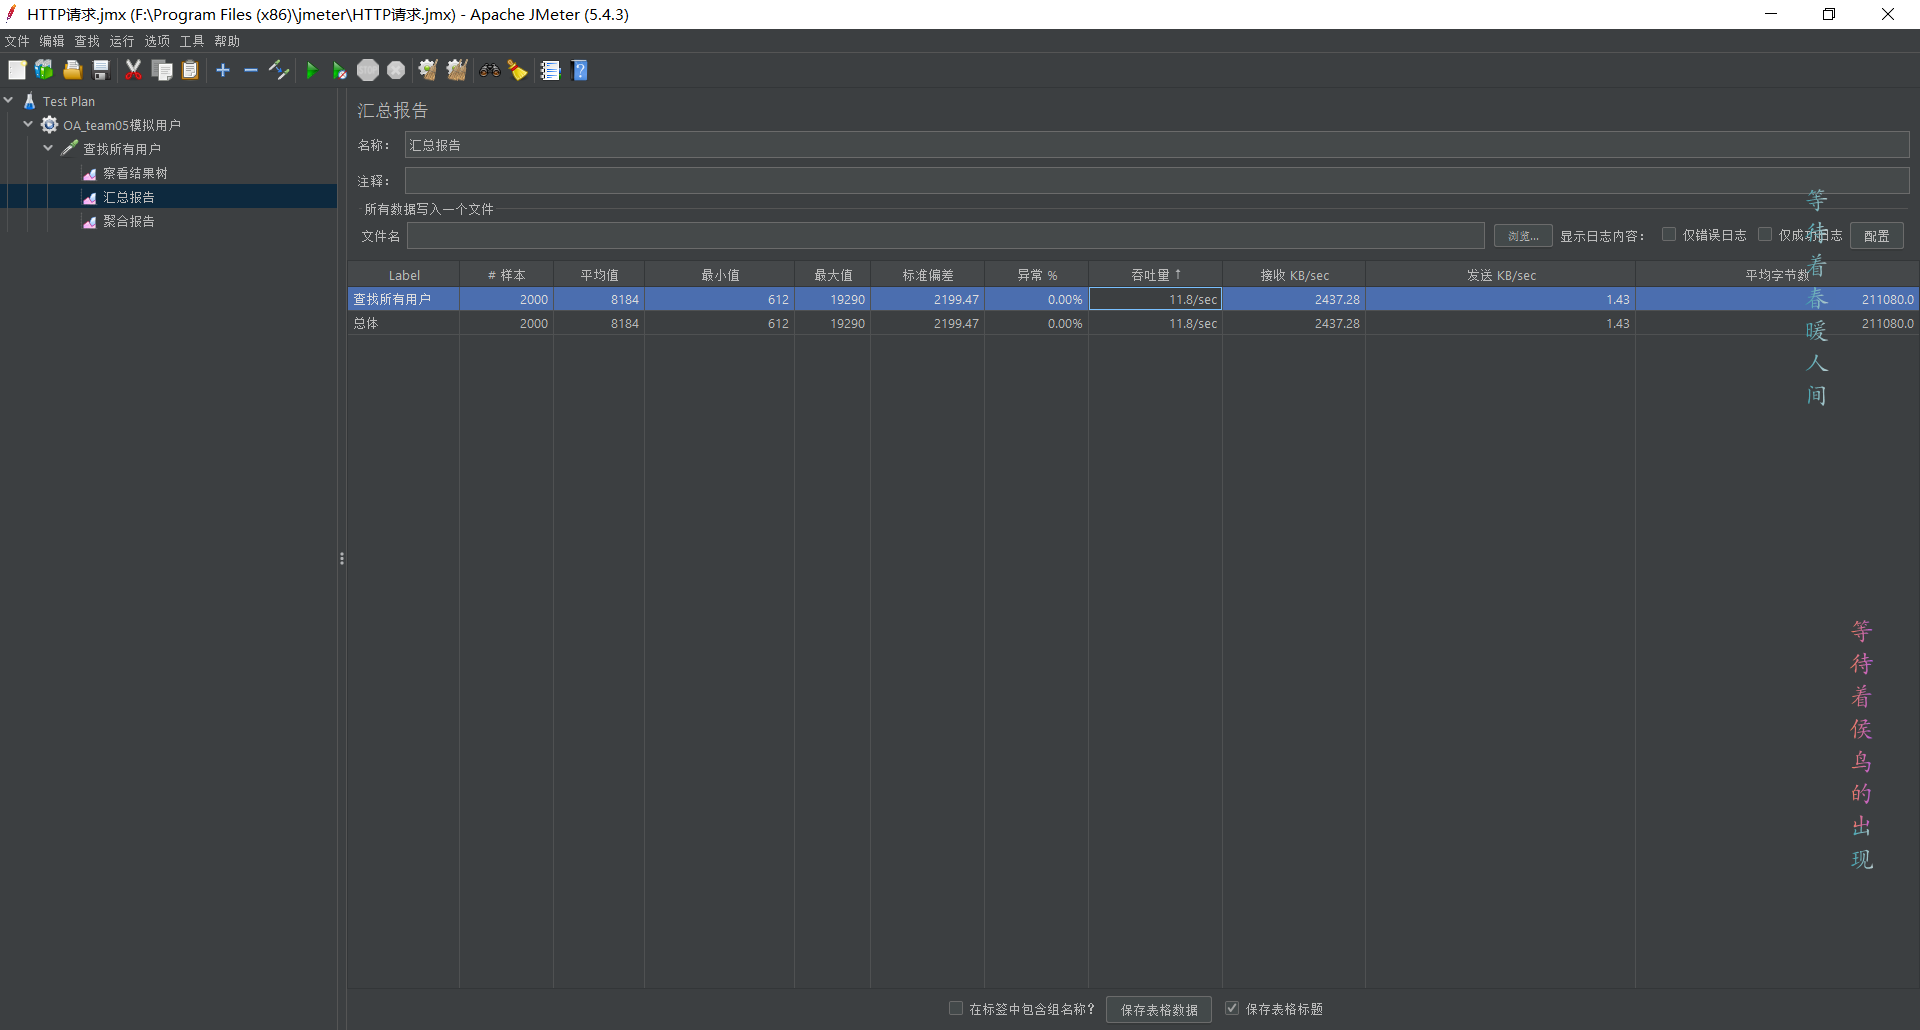
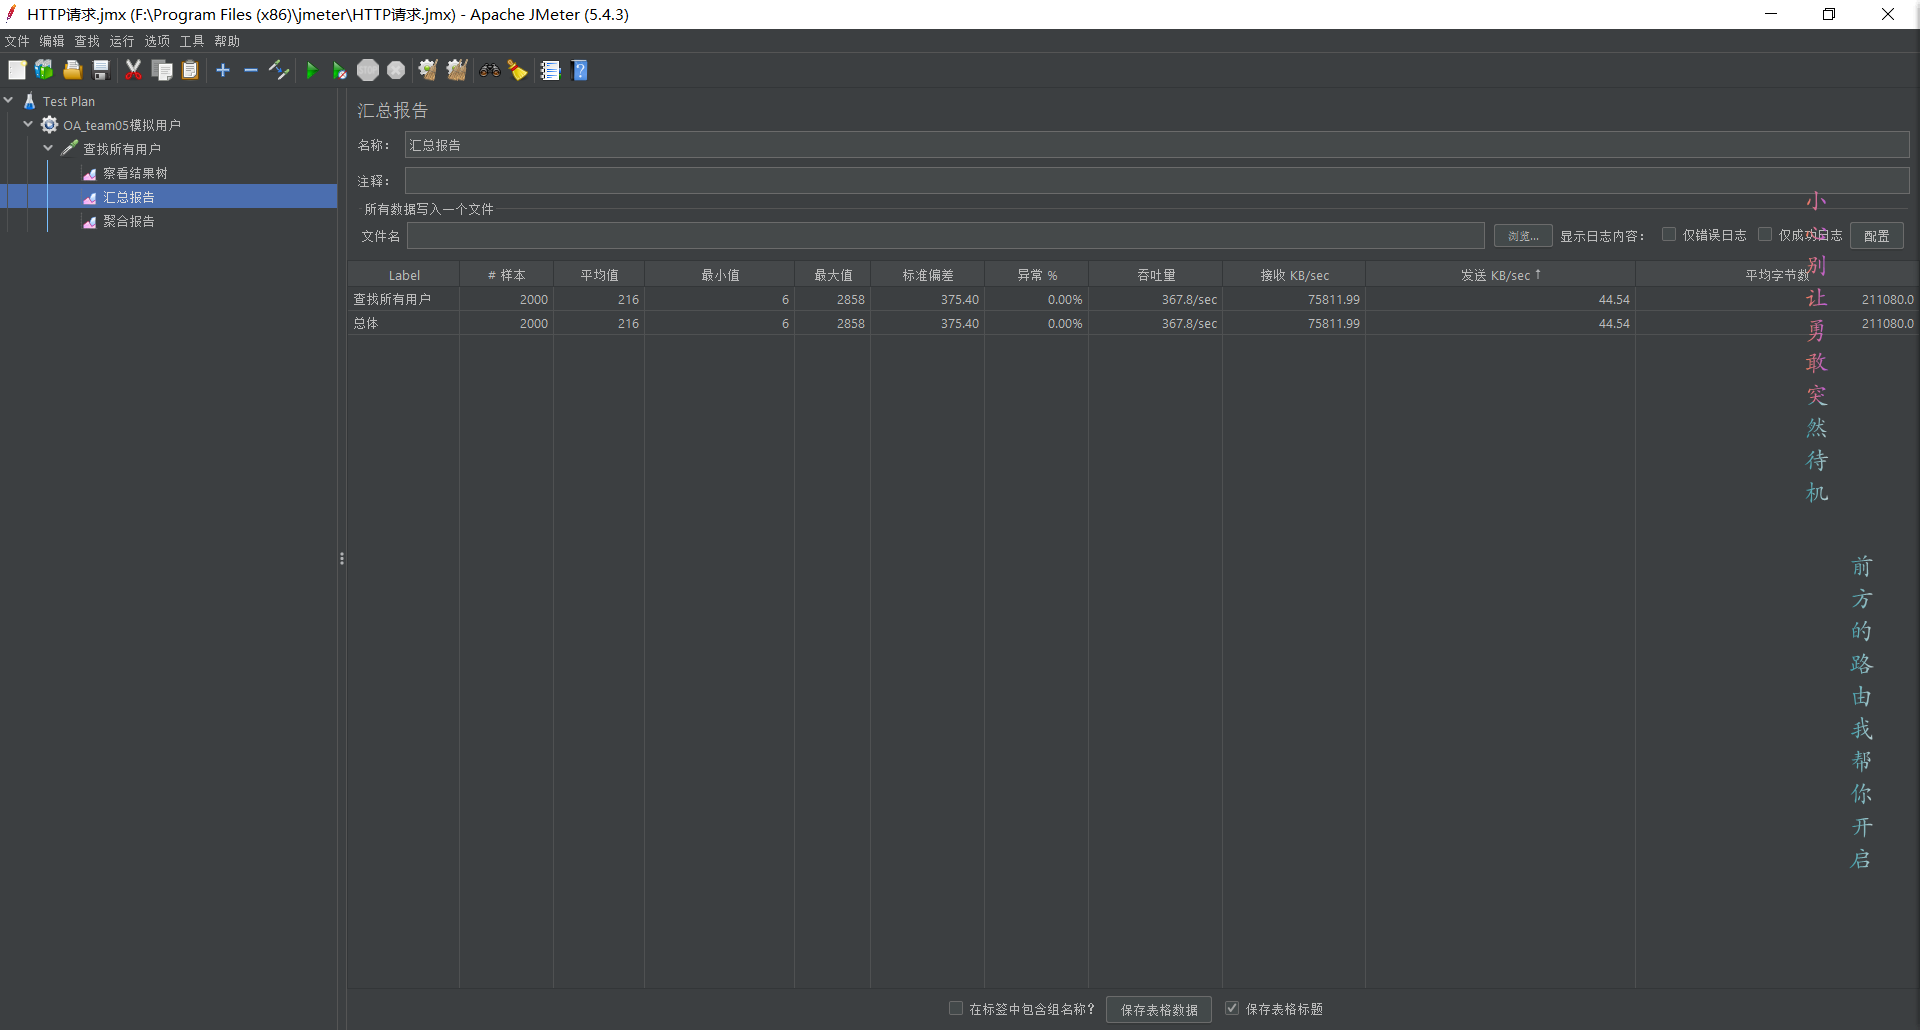
使用JMeter进行压力测试
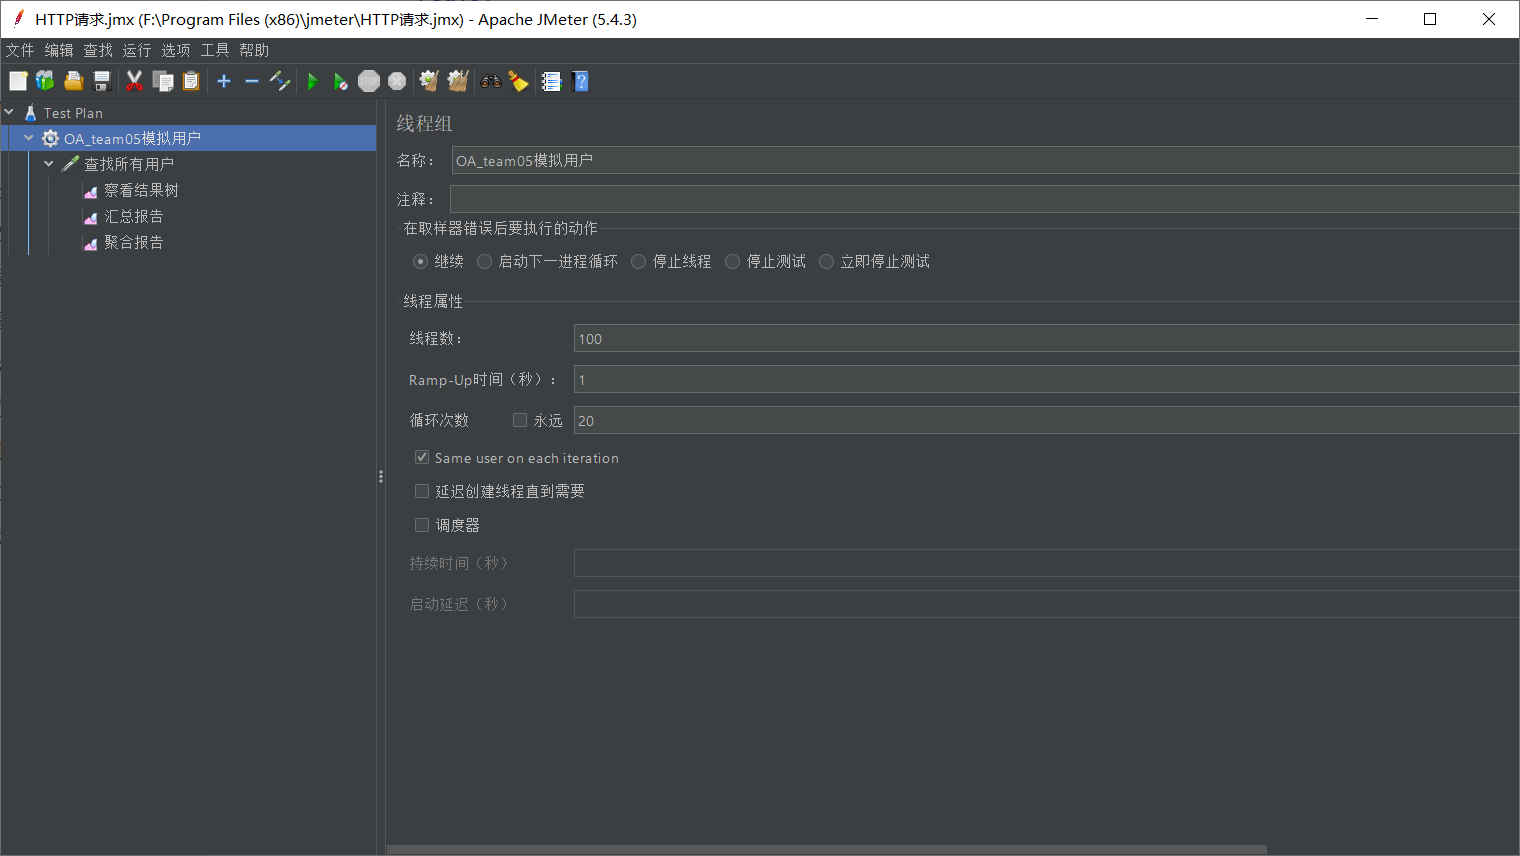
添加Redis缓存之前
添加Redis之后
JSR303
给Bean添加校验注解,并定义自己的message提示
java
/**
 * 品牌logo地址
 */
@URL(message = "logo必须是一个合法的url地址") private String logo;
开启校验功能
java
@RequestMapping("/save") public R save(@Valid @RequestBody BrandEntity brand){
  brandService.save(brand);
  return R.ok();
  }
给校验的Bean后紧跟一个BindingResult,可以获取到校验的结果
java
@RequestMapping("/save") public R save(@Valid @RequestBody BrandEntity brand,BindingResult result){
  if(result.hasErrors()){
  Map<String, String> map=new HashMap<>();
  result.getFieldErrors().forEach((item)->{
  String message=item.getDefaultMessage();
  String field=item.getField();
  map.put(field,message);
  });
  return R.error(400,"提交的数据不合法").put("data",map);
  }else{
  brandService.save(brand);
  }return R.ok();
  }
异常统一处理
controller类方法
java
  @RequestMapping("/save") public R save(@Valid @RequestBody BrandEntity brand){
  brandService.save(brand);
  return R.ok();
}新建exception包,并在其中新建GulimallExceptionControllerAdvice类
java
package com.atguigu.gulimall.product.exception;

import com.atguigu.common.utils.R;
import lombok.extern.slf4j.Slf4j;
import org.springframework.validation.BindingResult;
import org.springframework.web.bind.MethodArgumentNotValidException;
import org.springframework.web.bind.annotation.ControllerAdvice;
import org.springframework.web.bind.annotation.ExceptionHandler;
import org.springframework.web.bind.annotation.ResponseBody;
import org.springframework.web.bind.annotation.RestControllerAdvice;
import org.springframework.web.servlet.ModelAndView;

import java.util.HashMap;
import java.util.Map;

@Slf4j
@RestControllerAdvice(basePackages = "com.atguigu.gulimall.product.controller")
public class GulimallExceptionControllerAdvice {
  @ExceptionHandler(value = MethodArgumentNotValidException.class)
  public R handleValidException(MethodArgumentNotValidException e) {
    log.error("数据校验出现问题{},异常类型:{}", e.getMessage(), e.getClass());
    BindingResult bindingResult = e.getBindingResult();
    Map<String, String> errorMap = new HashMap<>();
    bindingResult.getFieldErrors().forEach((fieldError) -> {
      errorMap.put(fieldError.getField(), fieldError.getDefaultMessage());
    });
    return R.error(400, "数据校验出现问题").put("data", errorMap);
  }
}
分组校验
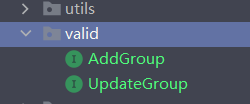
添加valid包,添加接口类,接口类不需要写代码
controller方法中添加@Validated注解
java
@RequestMapping("/update") public R update(@Validated({UpdateGroup.class}) @RequestBody BrandEntity brand){
  brandService.updateById(brand);
  return R.ok();
  }
entity实体类中的属性注解需要添加groups参数,并指定接口类
java
/**
 * 品牌id
 */
@TableId
@Null(message = "新增不能指定ID", groups = {AddGroup.class})
@NotNull(message = "修改必须指定ID", groups = {UpdateGroup.class})
private Long brandId;
注:没有指定分组的校验注解在分组校验情况下不生效
自定义校验
编写自定义校验注解
java
package com.atguigu.common.valid;

import javax.validation.Constraint;
import javax.validation.Payload;
import java.lang.annotation.*;

@Documented
@Constraint(validatedBy = {})
@Target({ElementType.METHOD, ElementType.FIELD, ElementType.ANNOTATION_TYPE,
  ElementType.CONSTRUCTOR, ElementType.PARAMETER, ElementType.TYPE_USE})
@Retention(RetentionPolicy.RUNTIME)
public @interface ListValue {

  String message() default "{com.atguigu.common.valid.ListValue.message}";

  Class<?>[] groups() default {};

  Class<? extends Payload>[] payload() default {};

  int[] vals() default {};
}
编写自定义校验器
java
package com.atguigu.common.valid;

import javax.validation.ConstraintValidator;
import javax.validation.ConstraintValidatorContext;
import java.util.HashSet;
import java.util.Set;

public class ListValueConstraintValidator implements ConstraintValidator<ListValue, Integer> {

  private Set<Integer> set = new HashSet<>();

  //初始化方法
  @Override
  public void initialize(ListValue constraintAnnotation) {
    int[] vals = constraintAnnotation.vals();
    for (int val : vals) {
      set.add(val);
    }

  }

  //判断是否校验成功

  /**
   *
   * @param value 需要校验的值
   * @param context
   * @return
   */
  @Override
  public boolean isValid(Integer value, ConstraintValidatorContext context) {
    return set.contains(value);
  }
}
关联校验器与注解
java
package com.atguigu.common.valid;

import javax.validation.Constraint;
import javax.validation.Payload;
import java.lang.annotation.*;

@Documented
@Constraint(validatedBy = {ListValueConstraintValidator.class})
@Target({ElementType.METHOD, ElementType.FIELD, ElementType.ANNOTATION_TYPE,
  ElementType.CONSTRUCTOR, ElementType.PARAMETER, ElementType.TYPE_USE})
@Retention(RetentionPolicy.RUNTIME)
public @interface ListValue {

  String message() default "{com.atguigu.common.valid.ListValue.message}";

  Class<?>[] groups() default {};

  Class<? extends Payload>[] payload() default {};

  int[] vals() default {};
}
使用自定义校验
java
/**
 * 显示状态[0-不显示;1-显示]
 */
@ListValue(vals = {0, 1})
private Integer showStatus;
定时任务
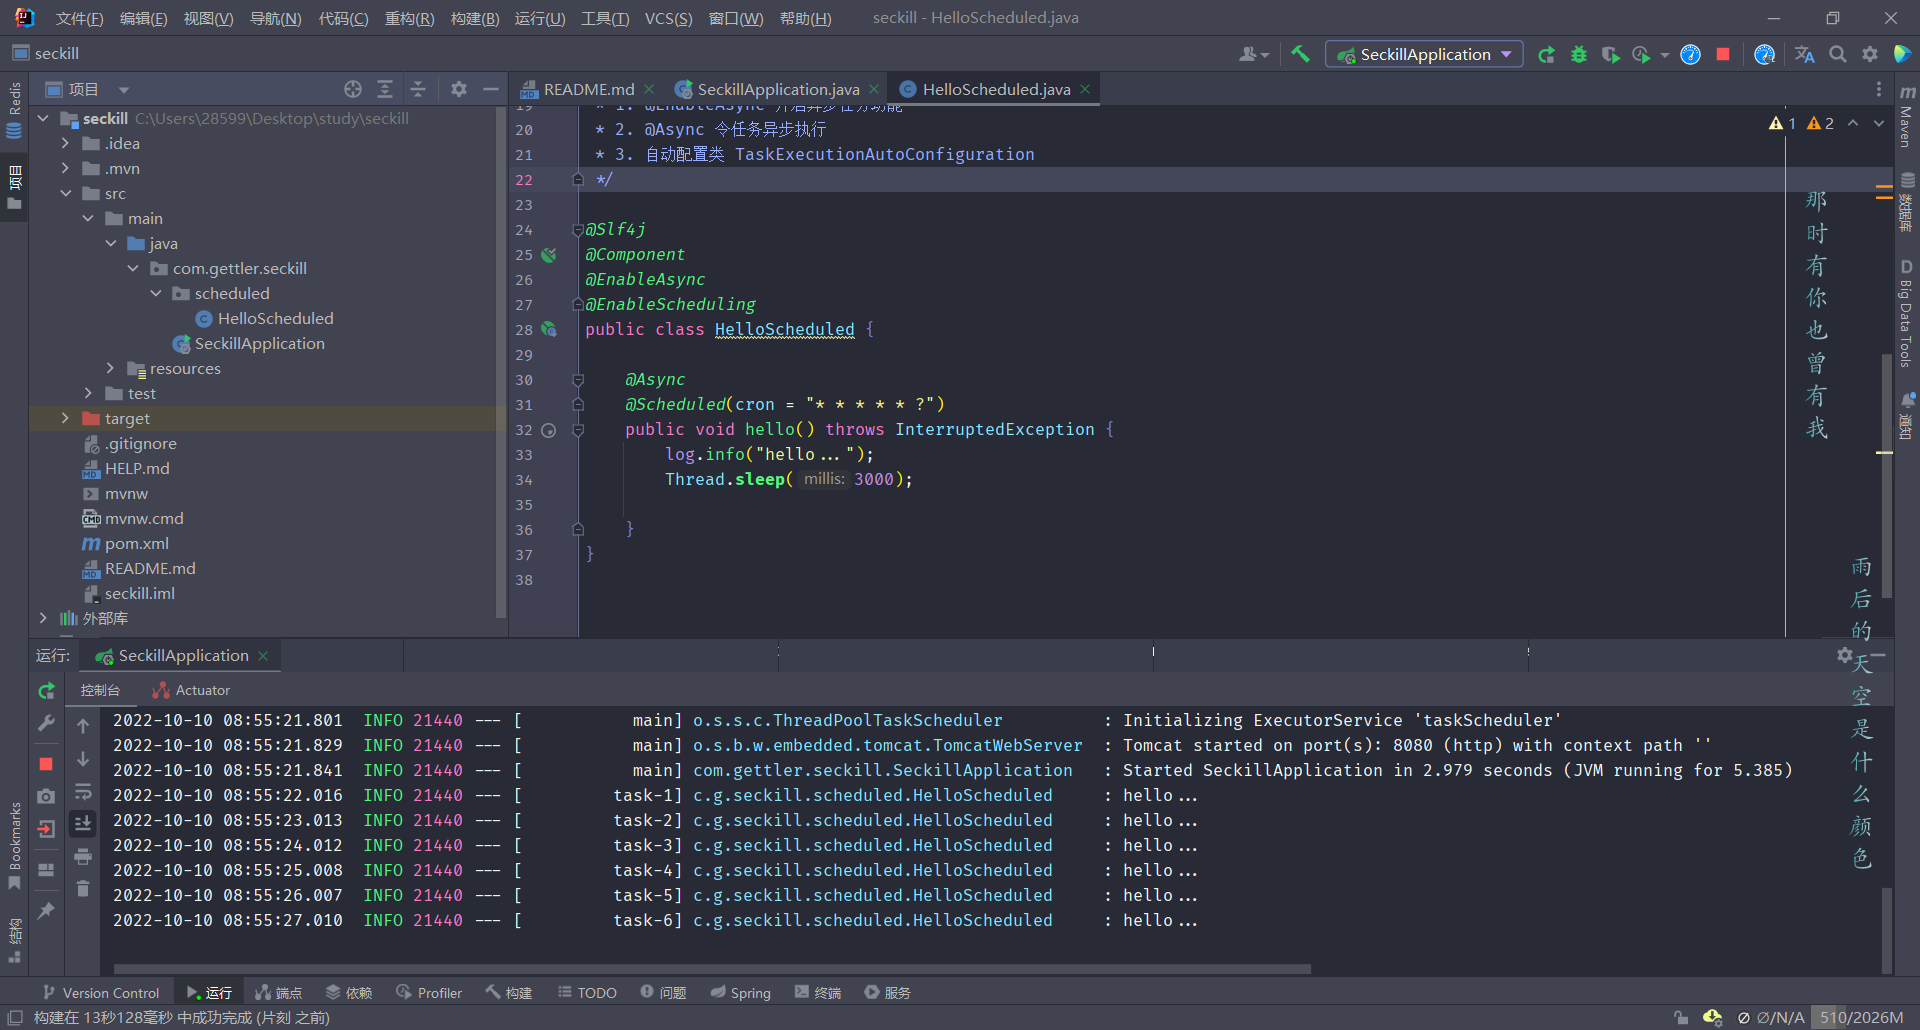
定时任务:
- @EnableScheduling 开启定时功能
- @Scheduled 开启一个定时任务
- 自动配置类 TaskSchedulingAutoConfiguration
异步任务:
- @EnableAsync 开启异步任务功能
- @Async 令任务异步执行
- 自动配置类 TaskExecutionAutoConfiguration
java
@Slf4j
@Component
@EnableAsync
@EnableScheduling
public class HelloScheduled {

  @Async
  @Scheduled(cron = "* * * * * ?")
  public void hello() throws InterruptedException {
    log.info("hello...");
    Thread.sleep(3000);
  }
}
Jsoup 爬虫
一些报错处理
找不到注入的对象
可以在 dao 层 的接口上添加 @Repository 注解
common 模块报错 Unable to find main class
由于common中只有一些常量与工具类,不需要主类,故出现该错误时只需删除pom文件中的build标签即可解决
网关模块报错 Failed to configure a DataSource: 'url' attribute is not specified and no embedded datasource could be configured.
原因是没有配置数据库相关信息,然而网关不需要与数据库交互,解决方法是在启动类上修改
java
@SpringBootApplication(exclude = DataSourceAutoConfiguration.class)关闭对数据库配置的自动装配即可
@Value注解获取不到配置值
原因:@Value注解不能给静态变量赋值
解决方法:编写Setter方法代替
java
    private static int port;

private static String username;

/**
 * 设置port
 *
 * @param port port
 */
@Value("${spring.rabbitmq.port}") public void setPort(int port){
  RabbitMqConnectionFactory.port=port;
  }

/**
 * 设置username
 *
 * @param username username
 */
@Value("${spring.rabbitmq.username}") public void setUsername(String username){
  RabbitMqConnectionFactory.username=username;
  }
运行@Test方法时,不能使用Scanner类在控制台输入数据
帮助—编辑自定义虚拟机选项,追加以下配置,重启Idea即可(help — Edit Custom VM Options)
shell
-Deditable.java.test.console=true运维过程中发现数据输入错误
某标准字段因误输入多了个空格,导致多个表数据错误,现要用sql语句修正该字段数据,如何在数据库中找到所有错误数据并修正呢?(Oracle数据库)
sql
SELECT 'UPDATE ' || TABLE_NAME || ' SET ' || COLUMN_NAME || ' = ''正确数据值'' WHERE ' || COLUMN_NAME || ' = ''错误数据值'';'
FROM ALL_TAB_COLUMNS
WHERE COLUMN_NAME = '列名' # COLUMN_NAME like '%模糊查找列名%'
  AND OWNER = '数据库名'
执行该语句后会自动生成更新语句,复制粘贴到执行面板,检查后执行即可
软删除和唯一约束冲突
数据库规范要求,业务上唯一的字段必须在数据库中建立约束,但是又想记录被删除的数据,做软删除,这就导致了删除了的数据会与未删除的数据发生冲突。
解决方案是将软删除加入唯一键列,例如,设置username和isdeleted为联合唯一,然后删除数据时将isdeleted赋值为主键,MyBatis的实现方法如下:
java
/**
 * 删除标记
 */
@TableLogic(value = "0", delval = "id") @TableField(fill = FieldFill.INSERT) protected Integer isDeleted;
hutool CollUtil 取交集,并集和差集
有个需求,实现班级学生的调整
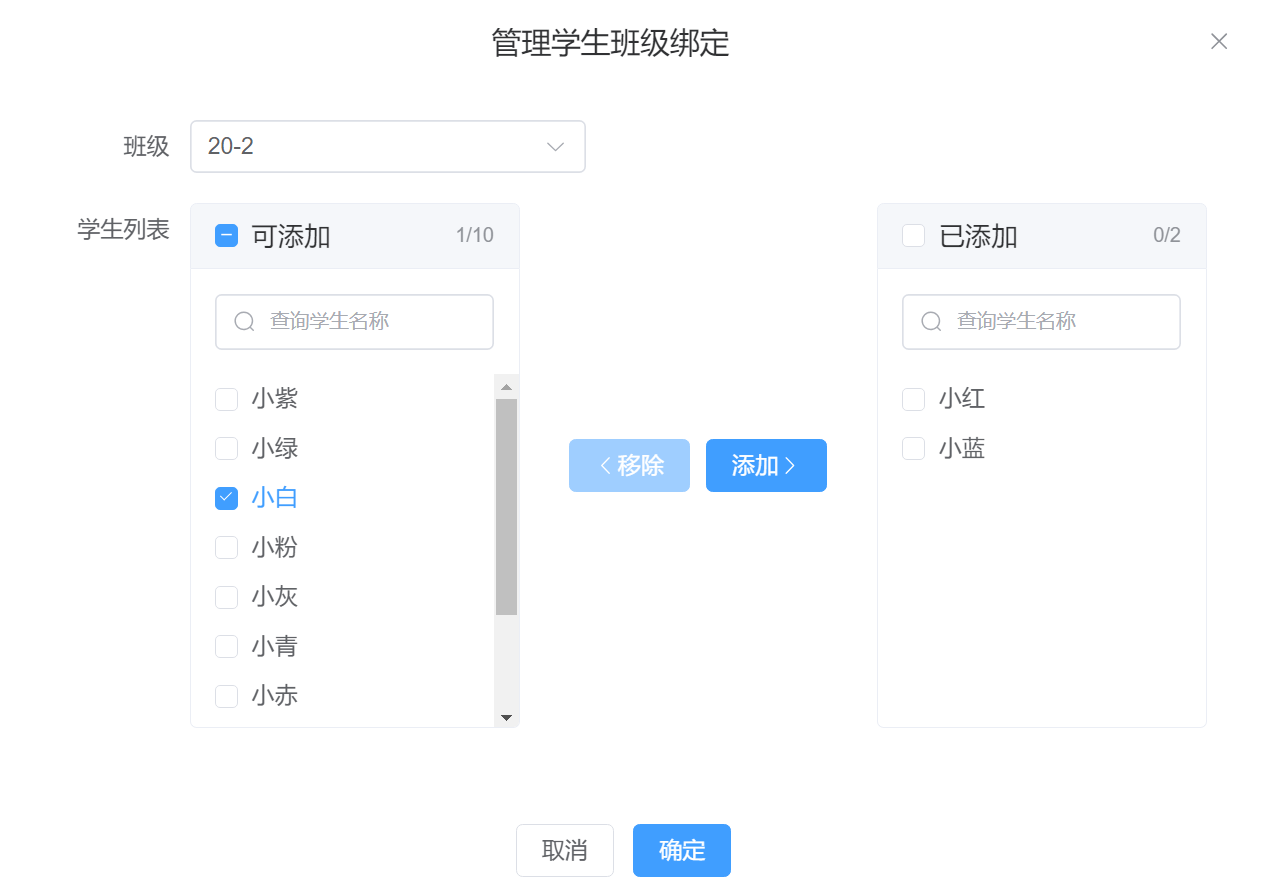
其实挺简单的,点击确定时候调用接口把该班级之前存储的学生删除,再把当前选中的学生存起来就行。但是因为用的是软删除,每次调整学生班级的时候,数据表里会多出好多没用的数据。
这里使用 hutool 的 CollUtil 进行集合操作,分开处理重复的数据与新增的数据。
CollUtil.intersection 取交集
CollUtil.subtract 取差集
CollUtil.disjunction 取交集的补集
CollUtil.union 取并集
具体实现如下
java
// 重复的(不需要操作的)
List<Long> repeatList = new ArrayList<>(CollUtil.intersection(新学生列表, 原学生列表));
  if(!repeatList.

equals(原学生列表)){
// 要删除的
List<Long> deleteList = new ArrayList<>(CollUtil.subtract(原学生列表, repeatList));
LambdaQueryWrapper<GradeStudentEntity> wrapper = new LambdaQueryWrapper<>();
  wrapper.

eq(GradeStudentEntity::getGradeId, vo.getGradeId());
  if(ObjectUtil.

isNotEmpty(deleteList)){
  wrapper.

in(GradeStudentEntity::getStudentId, deleteList);
  }

remove(wrapper);
  }
// 要新增的
List<Long> addList = new ArrayList<>(CollUtil.subtract(新学生列表, 原学生列表));
  if(!addList.

isEmpty()){
List<GradeStudentEntity> list = new ArrayList<>();
  for(
Long studentId:addList){
GradeStudentEntity entity = new GradeStudentEntity();
  entity.

setStudentId(studentId);
  entity.

setGradeId(vo.getGradeId());
  list.

add(entity);
  }

saveBatch(list);
  }
MyBatis 一对多映射
主子表的关系,想要一条sql查出来
mapper.xml如下
xml
<resultMap type="com.power.milk.vo.MilksetVO" id="milkSetVoMap">
  <result property="id" column="id"/>
  <result property="name" column="name"/>
  <result property="price" column="price"/>
  <result property="image" column="image"/>
  <result property="description" column="description"/>
  <result property="status" column="status"/>
  <collection property="flavorItems" ofType="com.power.milk.vo.MilkFlavorVO">
    <result property="id" column="f_id"/>
    <result property="name" column="f_name"/>
    <result property="description" column="f_description"/>
    <result property="number" column="f_number"/>
  </collection>
</resultMap>

<select id="getList" resultMap="milkSetVoMap">
select m.* ,
j.name AS CategoryName,
mf.id as f_id,
mf.name as f_name,
mf.description as f_description,
mf.number as f_number
from milkset m
left join milk_flavor mf on mf.milk_or_set = 2
and mf.milk_or_set_id = m.id and mf.is_deleted = 0
where m.is_deleted = 0
</select>
然后再写下 MilksetVO 类
java
package com.power.milk.vo;

import com.fasterxml.jackson.annotation.JsonFormat;
import com.fasterxml.jackson.databind.annotation.JsonSerialize;
import com.fasterxml.jackson.databind.ser.std.ToStringSerializer;
import com.power.milk.common.utils.DateUtils;
import io.swagger.annotations.ApiModel;
import io.swagger.annotations.ApiModelProperty;
import lombok.Data;
import org.apache.commons.lang3.StringUtils;

import java.io.Serializable;
import java.math.BigDecimal;
import java.util.ArrayList;
import java.util.Arrays;
import java.util.Date;
import java.util.List;

/**
 * 套餐
 *
 * @author Power
 * @since 2024-04-10
 */
@Data
@ApiModel(description = "套餐")
public class MilksetVO implements Serializable {
  private static final long serialVersionUID = 1L;

  @ApiModelProperty(value = "主键")
  @JsonSerialize(using = ToStringSerializer.class)
  private Long id;

  @ApiModelProperty(value = "牛奶分类id")
  @JsonSerialize(using = ToStringSerializer.class)
  private Long categoryId;

  @ApiModelProperty(value = "套餐名称")
  private String name;

  @ApiModelProperty(value = "套餐价格")
  private BigDecimal price;

  @ApiModelProperty(value = "图片")
  private String image;

  @ApiModelProperty(value = "套餐明细Json文本")
  private String flavorItemsJson;

  @ApiModelProperty(value = "套餐明细")
  private List<FlavorInMilk> flavorItems = new ArrayList<>();

}
en....可能不太规范,但是确实实现了

Spring Boot 运行单元测试时使用不同配置文件
学习RabbitMQ的时候要跑官网的例子,又不想写好几个项目跑,就直接在SpringBoot的项目里加了测试类,由于每个例子的配置又不太一样,就学习了下怎么指定配置文件运行单元测试
举个例子,下边这段是 fanout 模式的代码
java
package com.gettler.rabbitmq.fanout;

import com.gettler.rabbitmq.RabbitmqApplication;
import com.gettler.rabbitmq.config.RabbitMqConnectionFactory;
import com.rabbitmq.client.*;
import org.junit.Test;
import org.junit.runner.RunWith;
import org.slf4j.Logger;
import org.slf4j.LoggerFactory;
import org.springframework.boot.test.context.SpringBootTest;
import org.springframework.test.context.ActiveProfiles;
import org.springframework.test.context.junit4.SpringRunner;

@ActiveProfiles("fanout")
@RunWith(SpringRunner.class)
@SpringBootTest(classes = RabbitmqApplication.class, webEnvironment = SpringBootTest.WebEnvironment.RANDOM_PORT)
public class ConsumerATest {
  private static final Logger logger = LoggerFactory.getLogger(ConsumerATest.class);

  @Test
  public void testConsumerA() throws Exception {
    // 创建一个connection
    Connection connection = RabbitMqConnectionFactory.getSingleInstanceConnection();
    // 创建一个channel
    Channel channel = connection.createChannel();
    // 声明交换机
    channel.exchangeDeclare("fanout", BuiltinExchangeType.FANOUT);
    // 声明临时队列
    String queueName = channel.queueDeclare().getQueue();
    // 绑定队列与交换机
    channel.queueBind(queueName, "fanout", "");
    // 消费消息
    DeliverCallback deliverCallback = (consumerTag, message) -> {
      System.out.println("获得消息:" + new String(message.getBody()));
    };
    CancelCallback cancelCallback = (consumerTag) -> {
      System.out.println("消息消费被中断");
    };
    channel.basicConsume(queueName, true, deliverCallback, cancelCallback);
  }
}
@ActiveProfiles("fanout") 就是指定读取 fanout 配置文件
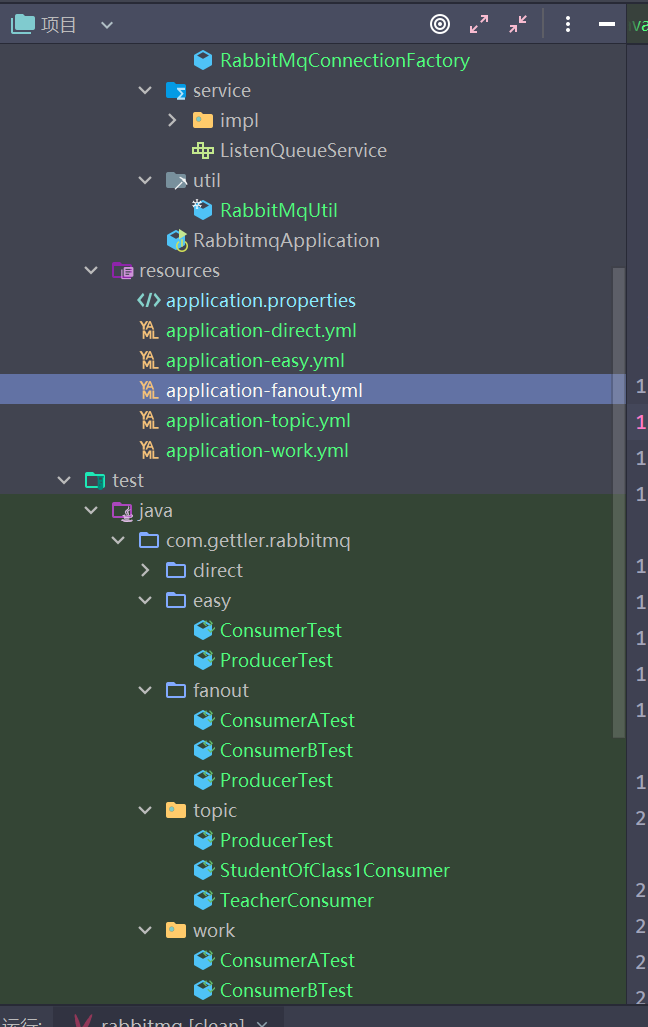
这样就可以读取到其他配置文件了
Java中JSON把引用相同的对象变为"$ref"
问题描述:
开发Java项目时,将多个对象转成JSON传到前端(因为是WebSocket传输,所以要手动转)
但是前端接收数据时发现其中很多对象变成了"$ref"
问题分析:
网上对这个问题的解决方法还是挺全的,一搜就有
出现这个问题的原因是fastjson有循环引用检测机制 循环引用:
- 当一个对象包含另一个对象时,fastjson就会把该对象解析成引用
- 当一个对象和另一个对象完全相同时,fastjson同样会把该对象解析成引用
解决方法:
转JSON时加个SerializerFeature.DisableCircularReferenceDetect参数,这样可以禁止循环引用检测
java
String info = JSON.toJSONString(gameVo, SerializerFeature.DisableCircularReferenceDetect);